 HDesktop wallpapers HDesktop wallpapers
From a young age, I was interested in photography. Of course, this was still the era of analog photography, and I couldn't wait
for the film to be developed and printed. With the introduction of digital photography, my hobby took off because I now controlled the entire
process from photographing to the final result.
I used many photos as desktop wallpapers, and that's how I came up with the idea of ??posting photos on my website in formats that
correspond to popular screen sizes. Initially, this was often an aspect ratio of 5x4 or 4x3, but nowadays it's
mainly 16x9 and 16x10. Only the older photos are still available in the older formats, since I keep only the widescreen formats in mind when editing (and
taking the photos).
|
|
 Bureaublad achtergronden Bureaublad achtergronden
Van jongs af aan was ik al ge�ntereseerd in fotografie. Uiteraard was dit nog de tijd van analoge fotografie en kon ik niet wachten
tot de film was ontwikkeld en afgedrukt. Met de introductie van digitale fotografie nam de hobby een enorme vlucht doordat ik nu het hele
proces van fotograferen tot en met het eindresultaat in handen had.
Veel foto's gebruikte ik als bureaublad achtergrond en zo kwam ik op het idee om foto's op mijn website te plaatsen in formaten die
overeenkomen met populaire beeldschermformaten. In het begin was dat veelal een beeld verhouding van 5x4 of 4x3 maar tegenwoordig is dit
voornamelijk 16x9 en 16x10. Alleen de oudere foto's zijn nu nog beschikbaar in de oudere formaten aangezien ik bij het bewerken (en tijdens
het nemen van de foto's) uit ga van breedbeeld formaten.
|
|
| |
Used camera's
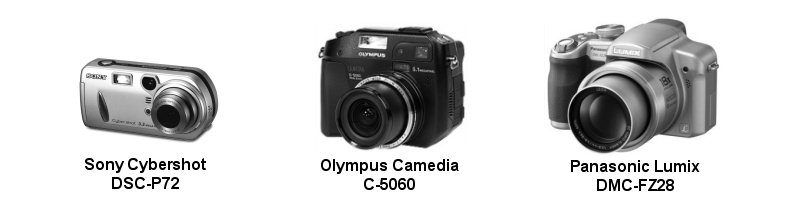
For the desktop wallpapers on this website I used several digital camera's. The oldest
photo's are taken with a "Sony DSC-P72" (a simple 3Mpixel
compact camera with 3x optical zoom) and some with a "Olympus C-5060" (a
more professional 5.1Mpixel camera with 4x optical zoom).
As of april 2009 I used a "Panasonic Lumix DMC-FZ28" (a 10Mpixel 18x
optical zoom camera). With an additional diopter this is an excellent
low cost macro camera (compared to a dSLR camera with macro lens).
|
|
Gebruikte camera's
Voor de bureaublad achtergronden op deze website heb ik gebruik gemaakt van diverse digitale camera's.
De oudste foto's zijn gemaakt met een "Sony DSC-P72" (een eenvoudige 3Mpixel compact camera
met 3x optische zoom) en enkele met een "Olympus C-5060" (een iets proffessionelere 5.1Mpixel
camera met 4x optische zoom).
Vanaf april 2009 heb ik een "Panasonic Lumix DMC-FZ28" (een 10Mpixel 18x optische zoom camera)
gebruikt. Met een additionele dioptrie is dit een uitstekende goedkope oplossing voor macro fotografie
(vergeleken met een dSLR camera met macro lens).
|
|
| |
 |
| |
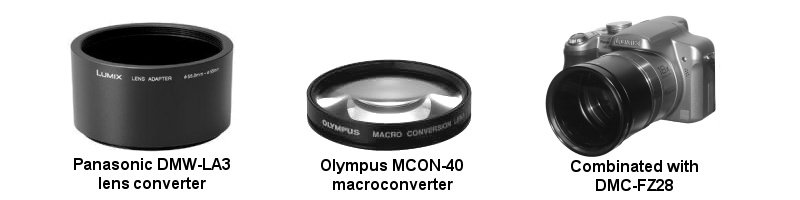
Macro photo's
To make macro photo's of insects the standard macro function of the
"Panasonic Lumix DMC-FZ28" wasn't sufficient. The solution was to place
an extra lens in front of the camera (a diopter).
To use additional lenses I needed the "Panasonic DMW-LA3 lens
converter". This is a simple tube that can be mounted on the camera's
body (55.8mm thread). On the other end of the tube the extra lens can be
fitted (55mm thread). The camera's lens is completely covered with this
tube.
To get some experience with diopters I ordered the "Massa +1/+2/+4
Macro-Effect Lens Filters (55mm 3-Lens Set)" for just
$16.50. With this set I made my first real macro photo's (between
05/07/2009 and 16/07/2009). For most photo's I used the +2 diopter lens
which made the focal length between object and camera about 50cm.
As could be expected the quality of the cheap lens set wasn't top of the
bill. But now I knew what kind of macro conversion lens I needed. So
within 2 weeks I ordered a "Olympus MCON40 macro converter"
which is a
+2.5 diopter lens. The distance between the object and the camera is
about 40cm with this lens. As from 16/07/2009 all my macro photo's
(with the "Panasonic Lumix DMC-FZ28") are taken with this lens.
|
|
Macro foto's
Om macro foto's te maken van insecten is de standaard macro functie van de
"Panasonic Lumix DMC-FZ28" niet voldoende. De oplossing hiervoor is om een
extra lens (een dioptrie) voor de lens van de camera te plaatsen.
Om dit mogelijk te maken is een "Panasonic DMW-LA3 lens converter" nodig.
Dit is een korte koker die op de camera behuizing rondom de lens geschroefd kan worden
(55.8mm schroefdraad). Aan de andere kant van de koker kan de extra lens worden geschroefd
(55mm schroefdraad). De lens van de camera zit nu binnenin de koker.
Om wat ervaring op te doen met dioptrieën heb ik
voor slechts $16,50 de "Massa +1/+2/+4 Macro-Effect Lens Filters (55mm 3-Lens Set)" besteld.
Met deze set maakte ik mijn eerste echte macro opnames (tussen 05/07/2009 en 16/07/2009).
Voor de meeste foto's gebruikte ik de +2 dioptrie die de focus afstand tussen onderwerp en camera
ongeveer 50cm maakte.
Zoals verwacht was de kwaliteit van de goedkope set lenzen niet erg hoog, maar ik wist nu wat voor
macro conversie lens ik nodig had. Dus bestelde ik 2 weken later de "Olympus MCON40 macro converter",
wat een +2.5 dioptie lens is. De afstand van het onderwerp tot de camera hiermee is ongeveer 40cm.
Vanaf 16/07/2009 zijn al mijn macro foto's (met de "Panasonic Lumix DMC-FZ28") gemaakt met
deze lens.
|
|
| |
 |
| |
Stock photo's
In july 2010 I was accepted as photographer to ShutterStock.
This is one of the biggest stockphoto sites in the world. Regularly I upload my best images to this website
and after being reviewed they can be used on websites, in adverts or print. This doesn't bring a very big income but it does motivate me
to improve my skills and quality of the images.
|
|
Stock foto's
In juli 2010 werd ik geaccepteerd als fotograaf bij ShutterStock.
Dit is één van de grootste stockfoto sites van de wereld. Ik upload regelmatig mijn beste foto's naar deze website
en nadat ze zijn goedgekeurd kunnen ze gebruikt worden op websites, advertenties en drukwerk. Het levert niet veel
op maar het motiveert me wel om mijn vaardigheid en de kwaliteit van de foto's steeds weer te verbeteren.
|
|
| |
Nikon dSLR
Due to the visible sensor noise (at full size) of my Panasonic Lumix DMC-FZ28 camera lots of images where
not accepted by Shutterstock. This made me buy a Nikon D90 dSLR (digital Single Lens Reflex) camera. At first I
used the Nikkor 50mm and 35-70mm lenses I still had from my old analog Nikon EM SLR. Later I bought a Nikkor 18-200mm
lens which is an exceptionally good allround lens.
My diopters I got for macro photography are suitable for the 50mm and 35-70mm lenses but not for the 18-200mm.
So until I have a dedicated macro lens I use a Canon 500D +2 diopter with a diameter of 72mm.
|
|
Nikon dSLR
Vanwege de in foto's (op volledige grootte) zichtbare sensor ruis van de Panasonic Lumix DMC-FZ28 camera werden
veel van mijn foto's niet geaccepteerd bij Shutterstock. Dit bracht mij er toe een Nikon D90 dSLR (digital Single
Lens Reflex) camera aan te schaffen. In het begin gebruikte ik de 50mm en 35-70mm lenzen die ik nog had van mijn
oude analoge Nikon EM SLR. Later heb ik een Nikkor 18-200mm lens gekocht wat een uitstekende allround lens is.
De dioptrieën die ik had voor macro fotografie zijn geschikt voor de 50mm en 35-70mm lens maar niet voor de 18-200mm.
Totdat ik een echte macro lens heb gebruik ik nu een Canon 500D +2 dioptrie met een diameter van 72mm.
|
|
| |
 |
| |
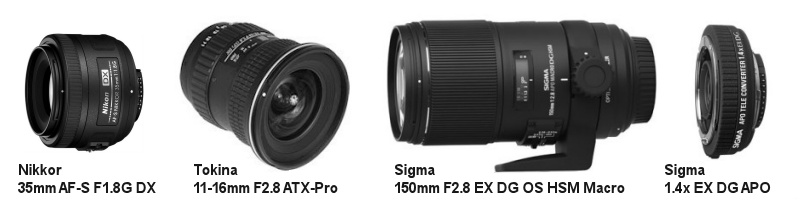
Additional lenses
Finally I got my first real macro lens: the Sigma 150mm F2.8. This is a great lens wich allows me to keep enough distance
from the insects not to scare them away. Due to the long focal distance and the weight of the lens a tri- or monopod is
required to get a good macro shot. In combination with the Sigma 1.4x macro converter the lens is also suitable for shooting
birds.
Besides this lens I also bought a Tokina 11-16mm F2.8 wide angle zoom lens for landscape photography and a Nikor 35mm F1.8 for general
purposes, a lens every Nikon DX camera owner should have.
|
|
Aanvullende lenzen
Eindelijk mijn eerste echte macro lens: de Sigma 150mm F2.8. Dit is een fantastische lens die genoeg afstand tot het insect toelaat
dat ze niet direct opschrikken. Vanwege deze afstand is een statief of monopod nodig om een goede macro foto te maken. In combinatie
met de Sigma 1.4x tele converter is deze lens ook bruikbaar om vogels te fotograferen.
Naast deze lens heb ik ook een Tokina 11-16mm F2.8 groothoek zoomlens aangeschaft voor landschap fotografie en een Nikor 35mm F1.8 voor
algemeen gebruik, een lens die iedere Nikon DX camera eigenaar zou moeten hebben.
|
|
| |
 |
| |
Nikon D7200
As using my photo gear frequently my demands grew and I ran into the limitations of the Nikon D90. Especialy the 11 focus point where only the center is of the cross type limit the use for insect photography. That's why I bought the Nikon D7200 which has 51 focus points and 15 of the cross type.
|
|
Nikon D7200
Doordat ik mijn foto uitrusting veel gebruik werden mijn eisen hoger en liep ik tegen de beprekingen van de Nikon D90 aan. Vooral de 11 focus punten met alleen de middelste van het kruis type beperken het gebruik voor insect fotografie. Daarom heb ik de Nikon D7200 aangeschaft die 51 focus punten heeft waarvan 15 van het kruis type.
|
|
| |
 |
| |
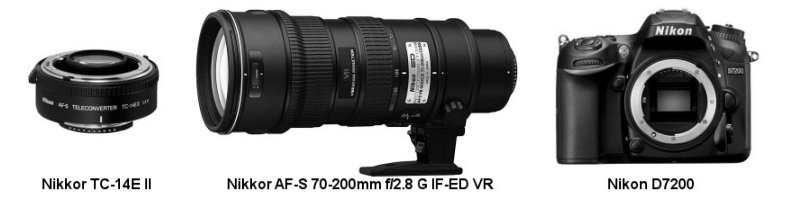
Aircraft spotting
In 2019 I picked up an old hobby of mine. Between 1982 and 1987 I was often to be found along the fences of militairy airbase Leeuwarden taking pictures of the planes.
Back then I used a SLR with a 135mm telelens and later a 70-210mm zoomlens. Since quite a lot had been changed now you need at least double the lens length to get similar shots.
As high quality lenses don't come cheap I bought a used Nikkor 70-200mm f2.8 zoomlens and a Nikkor TC-14E II teleconvertor. For the D7200 this combination results in a 147-420mm f4.0 zoomlens.
|
|
Vliegtuig spotten
In 2019 heb ik een oude hobby opgepakt. Tussen 1982 en 1987 was ik vaak te vinden langs de hekken van het militaire vliegveld Leeuwarden om foto's te maken van de vliegtuigen.
Destijds gebruikte ik een SLR met een 135mm telelens en later een 70-210mm zoomlens. Omdat er nogal wat was veranderd is nu minstens de dubbele lenslengte nodig om gelijkwaardige foto's te maken.
Omdat kwaliteits lenzen niet goedkoop zijn heb ik een gebruikte Nikkor 70-200mm f2.8 zoomlens en een Nikkor TC-14E II teleconverter gekocht. Voor de D7200 resulteert deze combinatie in een 147-420mm f4.0 zoomlens.
|
|
| |
 |
| |
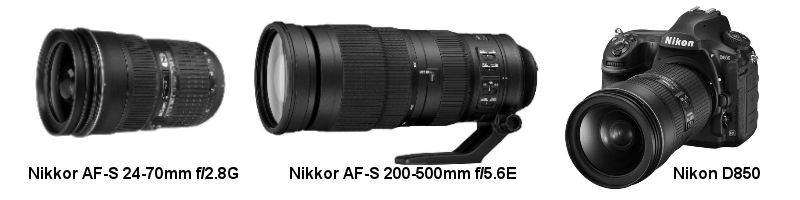
Upgrading my gear
For photographing military aircraft, the 70-200mm lens with the 1.4x teleconverter proved somewhat limited. After extensive research into a larger lens, I finally purchased the Nikkor AF-S 200-500mm f/5.6E zoom lens. This finally gave me ample range, and the lens proved to be suitable for more than just aircraft photography. I use it frequently for photographing birds in the wild and in zoos.
Since the coronavirus pandemic in 2021, my partner has also become addicted to photography and she often uses my 18-200mm lens. I had a good alternative for the 70-200mm range, but up to 70mm, I had no alternative other than the two fixed lenses of 35mm and 50mm. To fill this gap, I bought a secondhand Nikkor AF-S 24-70mm f/2.8G. Like my 70-200mm, it's a nice, high-quality lens.
The three zoom lenses combined have a range of 24-500mm and are all suitable for both DX (crop sensors) and FF (full-frame sensor) cameras, just like my Sigma macro lens. This made the step to a full-frame camera increasingly smaller.
I'd had my eye on the Nikon D850 for a while, but its price held me back for a long time. I found alternatives like the D750 and D780 too limited in terms of pixel count. Finally, I found a used D850 with less than 8,000 clicks for about half the price of the original. I haven't regretted buying it for a moment. What a fantastic camera !
|
|
Opwaarderen uitrusting
Voor het fotograferen van de militaire vliegtuigen bleek de 70-200mm lens met de 1.4x teleconverter toch wat beperkt. Na een uitgebreid onderzoek naar een grotere lens heb ik uiteindelijk de Nikkor AF-S 200-500mm f/5.6E zoomlens gekocht. Hiermee had ik eindelijk ruim voldoende bereik en de lens bleek zeker niet alleen geschikt te zijn voor het fotograferen van vliegtuigen. Ik gebruik hem veelvuldig voor het fotograferen van vogels in het wild en in dierentuinen.
Omdat mijn partner sinds de corona periode in 2021 nu ook verslingerd is geraakt aan fotografie gebruikt zij veelal mijn 18-200mm lens. Zelf had ik een goed alternatief voor de 70-200mm range maar tot 70mm had ik geen alternatief behalve de 2 vaste lenzen van 35mm en 50mm. Om dit gat op te vullen heb ik een tweedehands Nikkor AF-S 24-70mm F/2.8G gekocht. Dit is net als mijn 70-200mm een mooie kwaliteits lens.
De 3 zoomlenzen gecombineerd hebben een bereik van 24..500mm en zijn allemaal geschikt voor zowel DX (crop sensors) als FF (full-frame sensor) camera's net als mijn Sigma macrolens. De stap om over te gaan naar een full-frame camera werd daardoor steeds kleiner.
Ik had mijn oog al een tijdje op de Nikon D850 maar de prijs hiervan heeft mij lang tegengehouden. Alternatieven als de D750 en D780 vond ik te beperkt in het aantal pixels. Uiteindelijk vond ik een tweedehands exemplaar van de D850 met nog geen 8000 kliks voor ongeveer de helft van de nieuwprijs. Van de aanschaf hiervan heb nog geen moment spijt gehad. Wat een geweldige camera !
|
|
| |
Filenames
I always add the date and time stored in the EXIF data of the photo to the front of
the photo's filename. Therefore all photo's are sorted by date and time in for example the Windows Explorer.
For this purpose I first used a program called THE Rename
by Hervé Thouzard.
After that I used the FastStone Image Viewer wich has the
functionality to rename an image with the use of its EXIF data. It is also a great program to review and organize photo's.
Unfortunately, renaming the Nikon RAW files didn't work properly. The date and time stamps were used instead of the date and time of the capture. Therefore, I created a simple application that renames both the JPG image and the corresponding RAW file using the EXIF data in the JPG file. See ExifPhotoDater for more information.
|
|
Bestandsnamen
Ik voeg altijd de datum en tijd die opgeslagen is in de EXIF data van foto toe aan het begin van
de bestandsnaam. Hierdoor worden alle foto's automatisch gesorteerd op datum en tijd in bijvoorbeeld de Windows Verkenner.
Hiervoor gebruikte ik eerst het programma THE Rename van Hervé Thouzard.
Daarna gebruikte ik de FastStone Image Viewer dat ook de functie heeft om een foto
te hernoemen aan de hand van de EXIF data. Het is ook een uitstekend programma om je foto's te beoordelen en organiseren.
Helaas ging het hernoemen van de Nikon RAW bestanden niet goed. Hierbij werd de datum en tijd van het bestand gebruikt in plaats van de de datum en tijd van de opname. Daarom heb ik een eenvoudige applicatie gemaakt die zowel de JPG opname als het bijbehorende RAW bestand hernoemd met behulp van de EXIF data in het JPG bestand. Zie hiervoor ExifPhotoDater.
|
|
| |
Paint Shop Pro
Before placing a photo on this website I slightly edit them with "Paint
Shop Pro". Mostly I use the "smart photo correction tool" to adjust
the brightness and colours. After that I cut the photo to fit within the
desired aspect ratios. Some photo's require more editing, like the
flies on a white background.
|
|
Paint Shop Pro
Voordat een foto geschikt is voor deze website bewerk ik deze enigzins in "Paint
Shop Pro". Meestal gebruik ik het "slimme foto correctie gereedschap"
om de helderheid en kleuren iets aan te passen. Daarna maak ik de uitsnedes voor de verschillende
scherm verhoudingen. Sommige foto's hebben meer bewerking nodig, zoals de vliegen op een witte achtergrond.
|
|
| |


|
| |
Determination
After editing a photo for the website I try to determine what kind of insect, plant or animal
the subject is and add the English name and the scientific name (between
brackets) to the end of the filename.
For this purpose I use several sources on the internet:
For damselflies and dragonflies I now use the book: "Libellen van
Europa" by Klaas-Douwe B. Dijkstra and Richard Lewington (ISBN 978 90
5210 700 4). The English version is called "Field Guide To The
Dragonflies Of Britain And Europe" (ISBN 978 09 5313 994 1).
I try to be as thorough as possible. But with some species determination
is quite difficult or even impossible from a photo. If you find a wrongly determined photo on this
website please notify me. Please use the e-mail link above.
|
|
Determinatie
Na het bewerkenvan een foto voor deze website probeer ik te determineren wat voor soort insect,
plant of dier het is. Ik voeg de engelse naam en de wetenschappelijke naam (tussen haakjes) toe
aan het eind van de bestandsnaam.
Hiervoor gebruik ik diverse bronnen op het internet:
Voor juffers en libelles gebruik ik ook het boek "Libellen van
Europa" by Klaas-Douwe B. Dijkstra and Richard Lewington (ISBN 978 90
5210 700 4).
Ik probeer zo grondig mogelijk te zijn. Helaas is determinatie bij sommige soorten
erg moeilijk zoniet onmogelijk vanaf een foto. Als je een verkeerd gedetermineerde foto op
deze website vindt stuur mij dan een bericht. Gebruik hiervoor de e-mail link rechtsboven.
|
|
